


Test methods for the performance of electro-optic modulator
1. Half-wave voltage test steps for electro-optic intensity modulator
Taking the half-wave voltage at the RF terminal as an example, the signal source, the device under test and the oscilloscope are connected through a three-way device. When testing the half-wave voltage at the Bias terminal, connect it according to the dotted line.
b. Turn on the light source and signal source, and apply a sawtooth wave signal (the typical test frequency is 1KHz) to the device under test. The sawtooth wave signal Vpp should be greater than twice the half-wave voltage.
c. Turn on the oscilloscope;
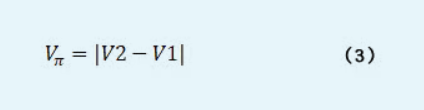
d. The output signal of the detector is a cosine signal. Record the sawtooth wave voltage values V1 and V2 corresponding to the adjacent peaks and troughs of this signal. e. Calculate the half-wave voltage according to Formula (3).
2. Test steps for half-wave voltage of electro-optic phase modulator
After connecting the test system, the optical path difference between the two arms that form the optical interferometer structure must be within the coherence length. The signal source and the RF terminal of the device under test as well as channel 1 of the oscilloscope are connected through a three-way device. After connecting the test system, the optical path difference between the two arms that form the optical interferometer structure must be within the coherence length. The signal source and the RF terminal of the device under test as well as channel 1 of the oscilloscope are connected through a three-way device, and the input port of the oscilloscope is adjusted to a high-impedance state.
b. Turn on the laser and signal source, and apply a sawtooth wave signal of a certain frequency (typical value 50KHz) to the device under test. The output signal of the detector is a cosine signal. The Vpp of the sawtooth wave signal should be greater than twice the half-wave voltage, but not exceed the input voltage range specified by the modulator, so that the output cosine signal of the detector presents at least one complete cycle.
c. Record the sawtooth wave voltage values V1 and V2 corresponding to the adjacent peaks and troughs of the cosine signal;
d. Calculate the half-wave voltage according to Formula (3).
3. Insertion loss of electro-optic modulators
Test steps
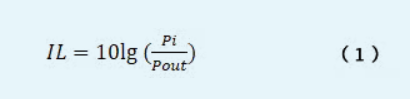
After connecting the light source and the polarizer, turn on the light source and test the input optical power Pi of the device under test with an optical power meter.
b. Connect the device under test to the test system, and link the output terminals of the regulated power supply to the pins 1 (GND) and 2(Bias) of the modulator (for some batches of modulators, the pin 1 of the modulator also needs to be connected to the housing).
c. Adjust the output voltage of the regulated power supply and test the maximum reading of the optical power meter as Pout.
d. If the device under test is a phase modulator, there is no need to add a voltage stabilizing power supply. The Pout can be directly read from the optical power meter.
e. Calculate the insertion loss according to Formula (1).
Precautions
a. The optical input of the electro-optic modulator must not exceed the calibration value on the test report; otherwise, the EO modulator will be damaged.
b. The RF input of the electro-optic modulator must not exceed the calibration value on the test sheet; otherwise, the EO modulator will be damaged.
c. When setting up an interferometer, there are relatively high requirements for the usage environment. Environmental shaking and optical fiber swaying can both affect the test results.
Post time: Aug-05-2025